- Dataneb Team

- May 16, 2018
- 3 min read
Updated: Jul 29, 2019

This blog article focuses on configuring Virtualbox to create a new VM for Oracle Linux 7 (OEL) and installing Oracle Linux 7 from the ISO image as a guest operating system.
The Oracle Linux 7 ISO image can be downloaded from edelivery.oracle.com – Oracle Software Delivery Cloud. You must have a valid Oracle Account (free) to download the Linux ISO.
Link: edelivery.oracle.com (downloaded platform x86 64 bit for this post, check your system configuration before you download)


Configuring Virtual Box
To create a VM, click on the New button on the top left corner and provide a descriptive name for the VM, type of OS and Version. The name that is specified will be used to identify the VM configuration:

Once the required information is provided, click on the Next button. Specify how much RAM you want to designate to your virtual machine. I have allocated 20 GB.

Click on Next button, lets keep Hard disk as default size.

Hit Create button, now keep Hard disk file type as VDI. We can change this later.

Hit Next button, keep storage as dynamic allocation.

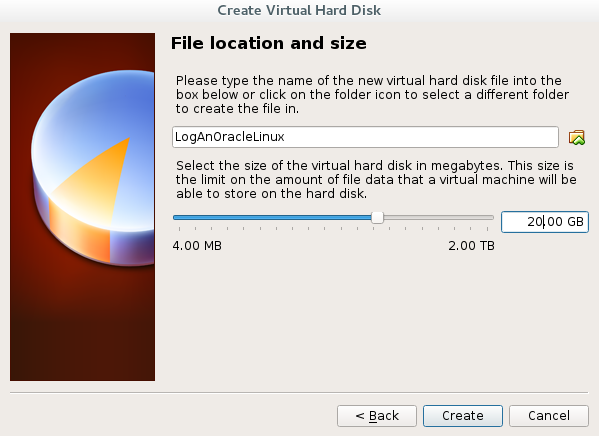
Hit Next button and configure file location and size. For this post lets go with 20 GB.

Hit Create button. Once the VDI disk is created with the specified size, you will be re-directed back to the main screen. You will be able to see all the details as shown below:

Go to Settings and select Network tab, change configuration to "Bridged Adapter" and Promiscuous Mode to "Allow All" as shown below:

Go to System tab and assign number of processors. I have selected 4 processors for this example:

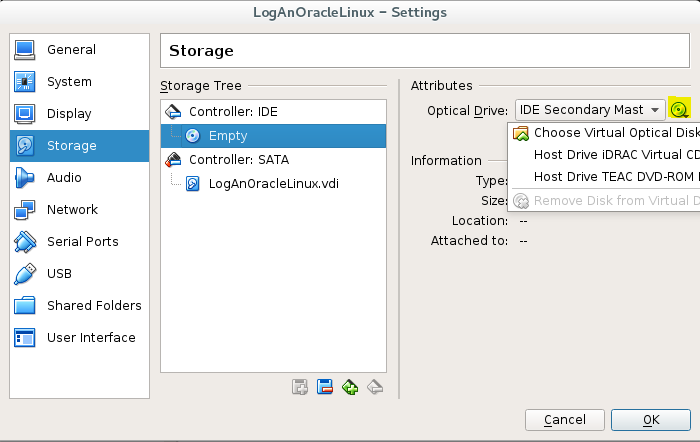
Now go to Storage tab and click on disk image to choose Virtual Optical Disk ISO image file which you downloaded initially from Oracle Cloud.

Click on OK and now you will be able to see Optical Drive ISO image file as highlighted below (it was empty before, refer old previous screenshots). Ignore the name as it depends on which ISO image you download from Oracle cloud.

Installing Oracle Linux
From the Oracle VM VirtualBox Manager screen, select your VM that you just created and click on the green Start icon on the top of the screen. Select the language as English (United States).

Hit Continue button.

Now select Installation Destination as Local Standard Disks.

Now go back and select Network & Host Name (currently it's shown as not connected). Turn ON the connection.

Now setup the ROOT password:

Create another User if you need. For instance I have created Hadoop user:

Let post-installation setup tasks finish. Once it's done, you can click on the Software Selection button and choose to install a “Server with GUI” option and choose the KDE desktop.

Click on the Done button after you select all the options that you want installed.
From the Configuration screen, click on the Reboot button. Once the VM reboots, you will be directed to the login prompt. Since we did a bare minimal installation, we will not enter into a GUI mode. Login with root user and password which we setup earlier.
Install net-tools package, Type: yum install net-tools

Once net-tools installs, Type: ifconfig

inet shown above will tell your IP address.
That's it !!! To check your Linux version, Type: uname -a , you will get something like below:
[root@localhost anonymous]# uname -a Linux localhost.localdomain 4.1.12-112.16.4.el7uek.x86_64 #2 SMP Mon Mar 12 23:57:12 PDT 2018 x86_64 x86_64 x86_64 GNU/Linux
If you have any question please mention it in the comments section below. Thank you!
_edited_edited.png)

Comments